Thanks to an accelerated learning curve with help by Mentors Erwin Denissen, Bhikkhu Pesala, vanisaac, Jowaco, pia frauss and others in these Forums, I’m offering my experiences with Slant Guides also known as Contour Guides, Construction Guides or just plain old Guide lines.
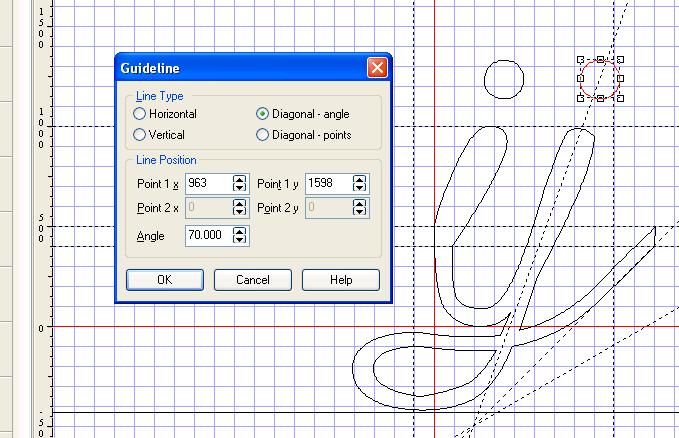
It is interesting to note that the order the points were selected in determines the direction [45 degrees or 225 for example] of the angle.
To convert it into a Vertical or Horizontal line, use the Line Type selections at the top of the Guidelines Window.
Caution: leaving the line type selected at Diagonal BUT setting the angle to 90 or 180 degrees messes up the program's trignometric functions resulting in "Out Of Range" errors.
Repeat as often as you wish as there does not seem to be a limit, but too many lines does make selecting nearby points awkward.
Deselect the two nodes when you have all the guidlines you need.
Or as an ALTERNATIVE to all of the above:
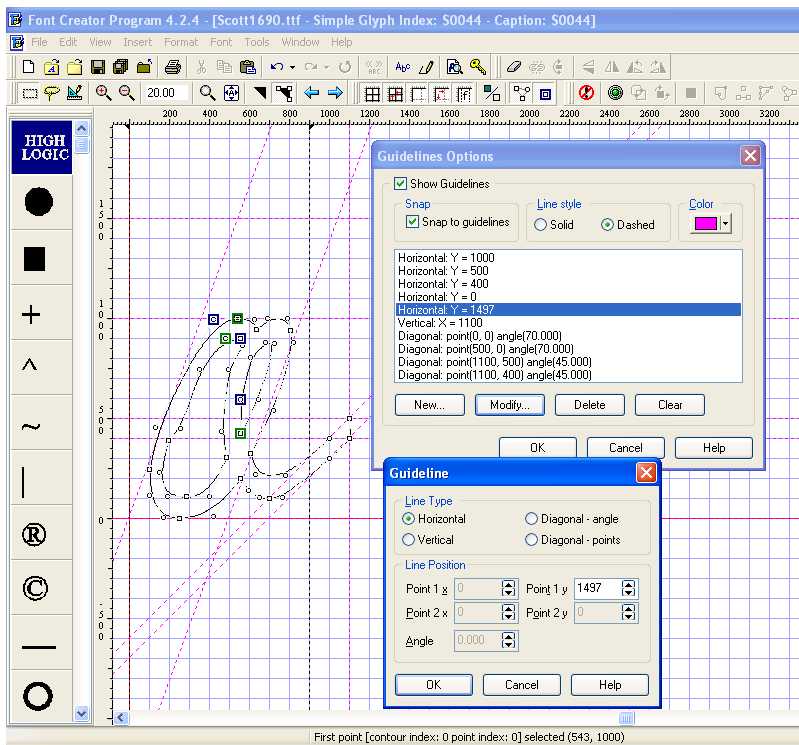
Click on Tools, then Guideline Options at any time to review all of your lines in one fell swoop.
Here you can insert new lines, change their colors, modify the lines to EXACT positions, or delete them.
The easiest way to select EVERYTHING is to click on Edit, then Select All. Double-clicking inside any contour will select that contour [Contour #, number of points, and contour direction appears at the bottom of the screen], or select any group of contours or points using either/and the box or shift key method mentioned in the second paragraph. Experiment a bit. This is FUN!
Select a point and press the A key to add a point. Press the F key to make it an OFF point. Press the N key to make it an ON point.
"OPTICAL CONTUSIONS" [I enjoy "Malaprops"] are eliminated by pressing the H key to remove all lines as you watch while moving things and decide the best position for each point or group of points in your glyph.
Use the Arrow keys to move 10 positions per key stroke.
Pressing the control key during this process allows movement at one position per stroke.
Additional points may be selected - or deselected - from the group by holding down the shift key and left-clicking [or by "boxing"] the desired points at any time as you slide everything into place and fine tune your masterpiece.
Before leaving the glyph, be sure to move the left bearing near the place you want, then select a single point near the bearing. Clicking on the Magnifying Glass will take you to a magnification of 500, allowing you to accurately set the bearing exactly where you want it. Otherwise you may return to the glyph at some future time and be dismayed to find that it is not where you left it.
Pressing the Fit In Screen button just right of the Magnifying Glass produces your full glyph, allowing you to select a point near the left bearing so you can zoom in and accurately place it too.
Remember, the bearings are not just lines in your glyph, they control the amount of "white space" on each side of your finished character.